Imagine that you could always entertain your customer for 24/7 on the web the same way an automated answering machine would.
Chat bots is the answer to this; you can answer queries, show user some of your product and even extract some information from your site’s user.
When facebook opens up the API for messenger, a lot of companies jump into the opportunity and creates all kind of automated bots.
Let’s jump in, we are going to build a bot that will echo whatever user is typing for facebook messenger that we will deploy in AWS infrastructure (lambda and API gateway).
To streamline the process, we are going to utilize an application framework aptly dubbed serverless framework.

Echoing Chat Bot
Setting up our chat-bot project
On top of node js, we are going to need an account in amazon aws and a developer account with facebook to test out our chat bot.
Let’s start with installing serverless framework and create the entrypoint to our application.
Installing serverless framework and creating our project
Let’s start with installing the serverless framework:
npm install -g serverless
Initialize a serverless project:
serverless create --template aws-nodejs --path chat-bot
cd chat-bot
We’ll need a library to be able to send request to facebook graph endpoint. for this, we are going to use the node-fetch to help.
At the moment of writing, serverless will not create the project with node js installed. Let’s initialize the package.json in our project:
npm init
next, let’s install node-fetch:
npm install --save node-fetch
Initial code to handle facebook request
On first registration, facebook will send out a request to specified endpoint to ensure that we are the owner of the webhook and try to confirm the subscription by using http get method.
Once subscribed, all other messages will be sent by facebook to the same endpoint using post method.
To handle this, we would need to create endpoints to allow our application to receive message from facebook and reply accordingly.
We are going to create 2 functions to handle verification request and messages respectively.
Let’s first update our serverless.yml to open up the endpoint. We will name this fbhook since this endpoint will deal explicitly with facebook calls.
| functions: | |
| fbverify: | |
| handler: handler.fbVerify | |
| events: | |
| - http: | |
| path: fbhook | |
| method: GET | |
| integration: lambda | |
| fbmessages: | |
| handler: handler.fbMessages | |
| events: | |
| - http: | |
| path: fbhook | |
| method: POST | |
| integration: lambda |
Now we’ll update the handle.js file to reply to the verification message. We would need to specify a token that we would register with facebook; for this, we will use sometoken.
| module.exports.fbVerify = (event, context, callback) => { | |
| if (event.query['hub.mode'] === 'subscribe' && | |
| event.query['hub.verify_token'] === 'sometoken') { | |
| console.log("Validating webhook"); | |
| return callback(null, parseInt(event.query['hub.challenge'])); | |
| } else { | |
| console.error("Failed validation. Make sure the validation tokens match."); | |
| return callback('Invalid token'); | |
| } | |
| }; |
With this step done, we can deploy our serverless application and connect it with facebook webhook.
Deploying our serverless application
Serverless framework comes equipped with a handful of useful cli commands, one of them is the serverless deploy which will create and deploy a cloudformation template when it comes to AWS deployment.
Assuming that you already have an AWS cli setup, serverless will make use of the AWS credentials set in the environment.
Run the following to trigger deployment of our serverless code.
serverless deploy
Serverless will create the necessary API Gateway and Lambda to handle the http requests.
If everything is smooth, you would see the endpoints that are created in your command line. The endpoint will look similar to this:
endpoints:
GET – https://xxxxxx.execute-api.us-east-1.amazonaws.com/dev/fbhook
POST – https://xxxxxx.execute-api.us-east-1.amazonaws.com/dev/fbhook
Connecting with facebook messenger
With our serverless code, what we need to do next is to register the endpoints in facebook developer console.
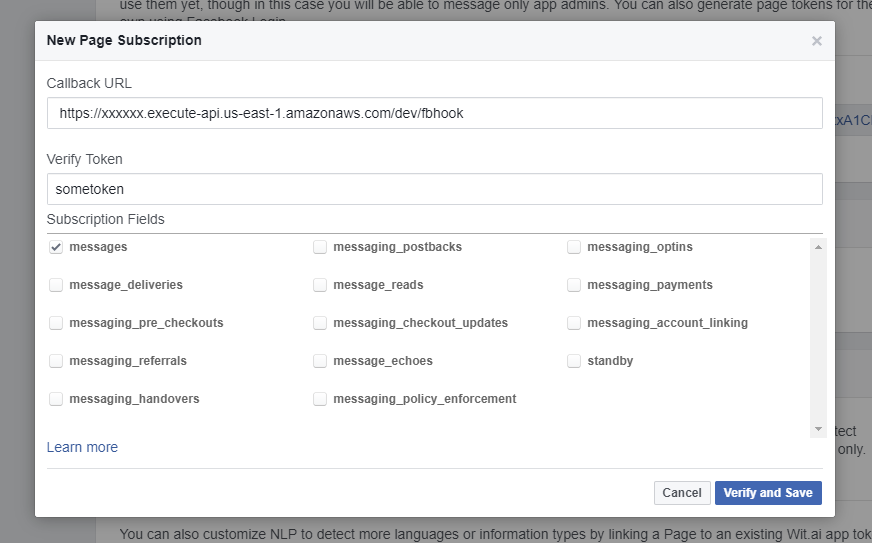
Follow along the getting started documentation in facebook developer site. During the webhook setup, we need to input the endpoints that we receive in the command line earlier.

FB Messenger webhook
When that is setup, facebook will sent request to our chat-bot webhook. You should be able to see the log in cloudwatch.

Cloudwatch log
Handling messages from facebook messenger
Now that we have our webhook verified, all messages that user is sending to our messenger will be forwarded to fbMessages function.
Let’s reply to all this messages by echoing what was sent by the user.
To do this, let’s implement fbMessages function in our handler.js. Add up another method export in handler.js and name it fbMessages
Note: Copy over your page token from facebook since we would need this to send messages back to facebook.
| module.exports.fbMessages = (event, context, callback) => { | |
| event.body.entry.map((entry) => { | |
| entry.messaging.map((messagingItem) => { | |
| if (messagingItem.message && messagingItem.message.text) { | |
| const url = `https://graph.facebook.com/v2.6/me/messages?access_token=<your access token here>`; | |
| const responsePayload = { | |
| recipient: { | |
| id: messagingItem.sender.id | |
| }, | |
| message: { | |
| text: messagingItem.message.text | |
| } | |
| }; | |
| nodeFetch( | |
| url, | |
| { | |
| method: 'POST', | |
| body: JSON.stringify(responsePayload), | |
| headers: {'Content-Type': 'application/json'} | |
| } | |
| ) | |
| .then(res => res.json()) | |
| .then(json => { | |
| console.log("Json result ", json); | |
| callback(null, json) | |
| }) | |
| .catch(error => { | |
| console.error("Call failed ", error); | |
| callback(null, error) | |
| }); | |
| } | |
| }); | |
| }); | |
| }; |
Once done, let’s deploy our chat bot application one more time.
serverless deploy
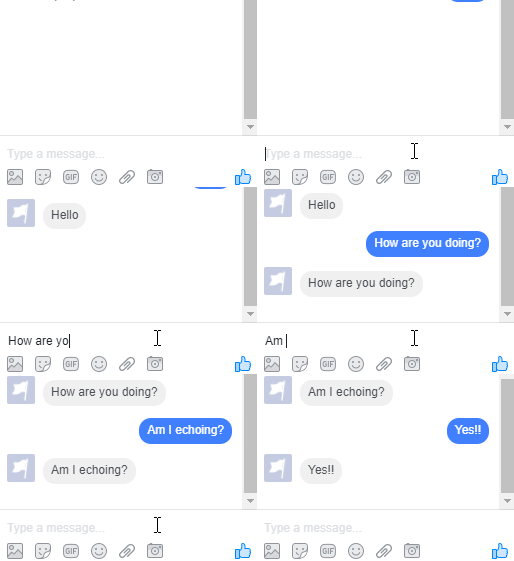
And we’re done! Your bot should now echo whatever message you’re sending through FB Messenger!

Echoing Chat Bot
The repository can be found at https://github.com/streetsmartdev/chatbot-serverless
