Working with chat bots can sometimes be a real pain. Most of the chat bot platform requires you to deploy your code in the cloud (and it has to be in https to make matter more complicated!) in order to test out the functionality.
I’ve tried this particular way of creating and testing chat bots before and it’s not the best experience, especially for developer. We love to have the capability to look at the application log in real time and even debug codes that we are writing to ensure that all the functionality are covered and behaving properly.
With Facebook messenger bot fortunately, there’s a way to be able to debug and run your bot application running locally through ngrok or localtunnel. Ngrok is more generic while localtunnel is more tailored for node environment.
Let’s have a look at the setup for ngrok and localtunnel to enable us debugging our chat bot application locally.
Setting up facebook bot
Start off your your facebook bot project by following the steps outlined at facebook’s own messenger platform documentation here https://developers.facebook.com/docs/messenger-platform/guides/quick-start.
The trick lies in the webhook portion of facebook app (Setup Weebhook portion of the tutorial). Keep this in mind, we’ll get back to this really soon.
Choose the tunnelling framework which you would prefer. Below are short guides on both ngrok and localtunnel.
Setting up ngrok
Download and setup ngrok on your local computer. Ngrok can be downloaded at this link.
Once you have ngrok setup, start off ngrok by running the command (in mac/unix):
./ngrok http 5000
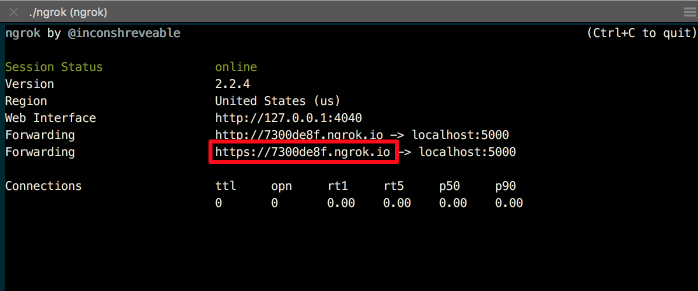
you will get a screen that shows the url of your active ngrok session. Keep the url for our use later.

Setting up localtunnel
Localtunnel details can be found at this link. Install localtunnel globally on your machine with the following command
npm install -g localtunnel
Once you have localtunnel installed, run it using the following command
lt --port 5000
you will get a url that shows you localtunnel url assigned to your session. Keep this url for our use in a short while.

Enable facebook messenger to talk to your localhost!
Whether you’ve set up ngrok or localtunnel, now is the time to connect facebook messenger to your localhost. By know you should have your ngrok or localtunnel URL to use with facebook bot.
We need to setup our facebook bot to send requests to our local url. Open up https://developers.facebook.com/ and select the Facebook application we’ve setup earlier.
Edit the file node/config/default.json in your project (assuming we’re forking facebook’s bot messenger sample)
{
    "appSecret": "<app secret found in facebook app dashboard page>",
    "pageAccessToken": "<page access token found in facebook app -> messenger page>",
    "validationToken": "testtoken", //any validation token that you'd like to use
    "serverURL": "https://7300de8f.ngrok.io" //This is your ngrok or localtunnel url setup earlier
}
Next, start your messenger app
npm start
Go to webhooks page and click on Edit Subscription. Update the URL in callback url with ngrok or localtunnel url. The url should look something like the following:
<localtunnel or ngrok url>/webhook

Now click Verify and Save. If everything is smooth, you should start seeing some logs in your local terminal. Now have fun logging and debugging facebook messenger chat bot on your local machine!

Start chatting with your bot, and you’ll see more and more log showing up in your local terminal 😉

facebook messenger chat

facebook messenger local bot logs
Know a better way to debug local chat bot development? Please share in the comment.
