For mobile apps development in iOS, CocoaPods has become an accepted dependency manager. Some of highly used library have their packages available in CocoaPods.
React native comes without CocoaPods built into their installation. Not to worry though, getting CocoaPods into your react native project is really straightforward!
Let’s go through the process of adding Fabric for iOS using CocoaPods in a react native project.
Installing CocoaPods
Get CocoaPods in your machine. Preferably, use the distribution through Ruby gem since mac OS comes bundled with Ruby and it’s a lot simpler to use.
gem install cocoapods
Wait until the installation is done and you are ready to use CocoaPods!
Initialising a react native project
For our project to work with CocoaPods, we need to have access into the iOS folder in the react native app.
If you are using react-native-cli, this is not a problem.
If you are using create-react-native-app, you may need to eject your project to get access to the iOS folder (not very sure at this point whether you would need to remove exponent too..)
Let’s use react-native-cli for this project.
react-native init RNFabric
cd RNFabric/ios
This will create a new project, and then we’ll go into the ios folder.
Adding CocoaPods support
Inside the ios folder, initialise the Podfile to manage your dependency.
pod init
This will create a Podfile inside your react native iOS project.
Installing fabric using CocoaPods
Edit your Podfile using any editor, and add up the following lines under # Pods for {project name} line
pod 'Fabric'
pod 'Crashlytics'
Troubleshooting
At the time of writing, we have to remove the ios-tv build step inside the dependency area for ios since CocoaPods will complain that ios-tv build step is redundant.
Remove the following block from inside target '{project name}' do block in the Podfile.
target '{project name}-tvOSTests' do
inherit! :search_paths
# Pods for testing
end
The full Podfile should look similar to the following:
| # Uncomment the next line to define a global platform for your project | |
| # platform :ios, '9.0' | |
| target 'RNFabric' do | |
| # Uncomment the next line if you're using Swift or would like to use dynamic frameworks | |
| # use_frameworks! | |
| # Pods for RNFabric | |
| pod 'Fabric' | |
| pod 'Crashlytics' | |
| target 'RNFabricTests' do | |
| inherit! :search_paths | |
| # Pods for testing | |
| end | |
| end | |
| target 'RNFabric-tvOS' do | |
| # Uncomment the next line if you're using Swift or would like to use dynamic frameworks | |
| # use_frameworks! | |
| # Pods for RNFabric-tvOS | |
| target 'RNFabric-tvOSTests' do | |
| inherit! :search_paths | |
| # Pods for testing | |
| end | |
| end |
Let’s continue by installing the dependencies into your project.
pod install
This should install all the dependencies into the iOS project. Now let’s take a detour into XCode. Spin up your XCode and open your project by pointing to the ios folder or the .xcworkspace file.
If the pod is installed successfully, you should see similar project hierarchy as follow:
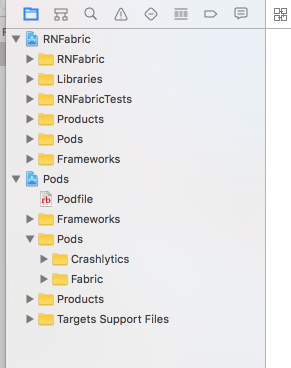
CocoaPods with react-native
Go ahead and add your fabric key and runtime script. You can get the keys in the Fabric’s official installation instruction (select objective-c as opposed to swift).
Now that you have fabric dependency installed, it’s time to enable react native to call Crashlytics.
Using fabric in react native
In order to enable calling Fabric Crashlytics, we are going to use the excellent react-native-fabric library. Install the dependency by running the following in your project’s root folder.
react-native install react-native-fabric
This last step should enable you to use fabric in your react native application. Check out the other blog post to use Fabric Crashlytics and Answers in react native for analytics.
That concludes our short tutorial on using CocoaPods as the dependency manager for native iOS libraries in react native.
Any easier ways? Leave your thoughts in the comments!